嘗試移植 Micro Python 到 RTL-8710

嘗試移植 Micro Python 到 RTL-8710

無聊在自己的藏寶箱 全是廢舊電子開發板 中找到了兩三片已經吃灰數年的 RTL-00 模塊,
大概幾年前玩 ESP8266 的時候, 有大佬吹這個模塊有多棒多棒, 然後跟風就買了一些。但是就一直沒用上。

於是乎, 今天意外地把它從塵封的箱子中翻了出來。
順便最近一直想玩 Micro Python, 就看看能不能順便玩玩。
那就開始吧 XD

魔改 NodeMCU
img

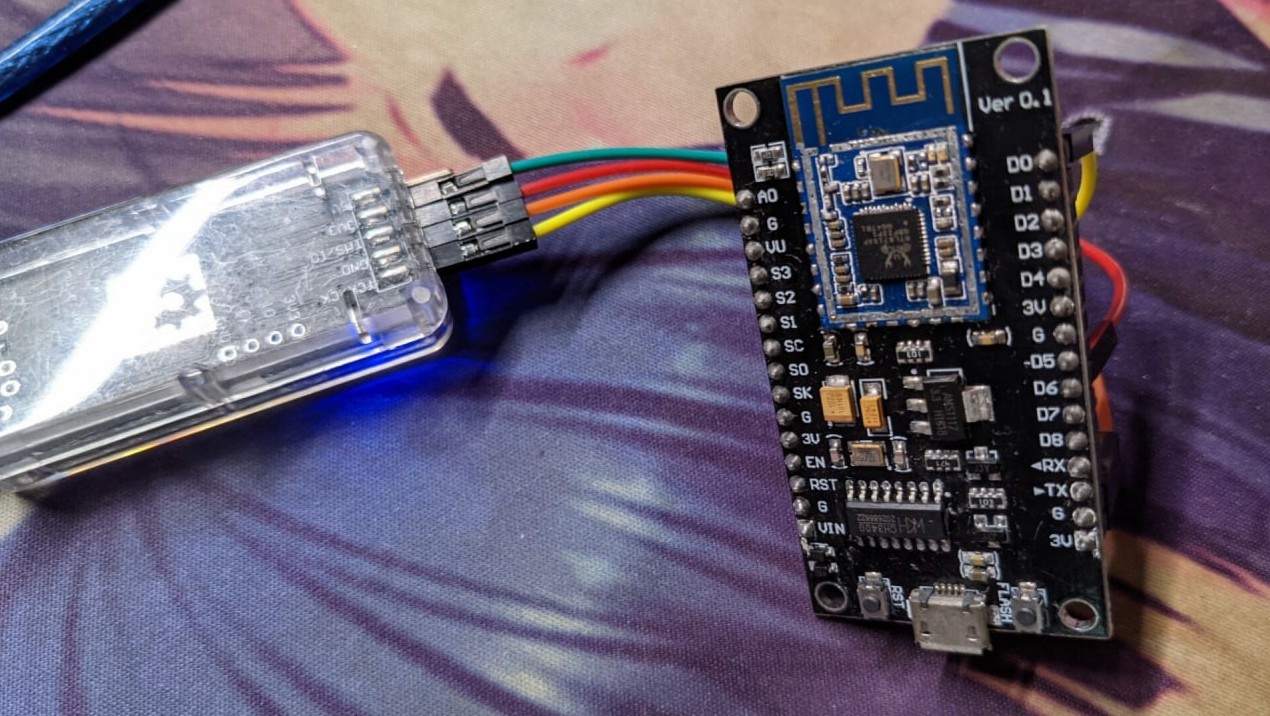
RTL-00 模塊從設計上就和 ESP8266 模塊 P2P (Pin-To-Pin) 兼容,
所以可以直接代換, 不會出問題。

那我就直接用 NodeMCU 開刀了。 (以前買了不少這個板子
然後只需要按照下表接綫

CMSIS-DAP NodeMCU
3V3 -> 3V
GND -> G
SWDIO -> D6
SWCLK -> D0
RX -> TX
TX -> RX

然後再用 OpenOCD 試著連上板子。
如果一切工作, 將會看到 OpenOCD 識別到一個 Cortex-M3 核。

1
> openocd -f interface/cmsis-dap.cfg -f target/ameba1-mod.cfg
展開命令行輸出

Open On-Chip Debugger 0.11.0 (2021-11-18) [https://github.com/sysprogs/openocd]
Licensed under GNU GPL v2
libusb1 09e75e98b4d9ea7909e8837b7a3f00dda4589dc3
For bug reports, read
http://openocd.org/doc/doxygen/bugs.html
Info : auto-selecting first available session transport “swd”. To override use ‘transport select ‘.
ameba1_init
Info : Listening on port 6666 for tcl connections
Info : Listening on port 4444 for telnet connections
Info : CMSIS-DAP: SWD supported
Info : CMSIS-DAP: JTAG supported
Info : CMSIS-DAP: Atomic commands supported
Info : CMSIS-DAP: FW Version = 0254
Info : CMSIS-DAP: Serial# = 0700000105deff3834334e4643206540a5a5a5a597969908
Info : CMSIS-DAP: Interface Initialised (SWD)
Info : SWCLK/TCK = 1 SWDIO/TMS = 1 TDI = 1 TDO = 1 nTRST = 0 nRESET = 1
Info : CMSIS-DAP: Interface ready
Info : clock speed 10000 kHz
Info : SWD DPIDR 0x2ba01477
Info : rtl8195a.cpu: Cortex-M3 r2p1 processor detected
Info : rtl8195a.cpu: target has 6 breakpoints, 4 watchpoints
Info : starting gdb server for rtl8195a.cpu on 3333
Info : Listening on port 3333 for gdb connections

CMSIS-DAP 几乎是基操了。
所以如果你常玩 ARM 設備, 我會推薦你買一個 CMSIS-DAP。

附一個我改過的 target 配置。
來源 drasko/rtl8710-sdk-3.5a

ameba1-mod.cfg
1
2
3
4
5
6
7
8
9
10
11
12
13
14
15
16
17
18
19
20
21
22
23
24
25
26
27
28
29
30
31
32
33
34
35
36
37
38
39
40
41
42
43
44
45
46
47
48
49
50
51
52
53
54
55
56
57
58
59
60
61
62
63
64
65
66
67
68
69
70
71
72
73
74
75
76
77
78
79
80
81
82
83
84
85
86
87
88
89
90
91
92
93
94
95
96
97
98
99
100
101
102
103
104
105
106
107
108
109
110
111
112
113
114
115
116
117
118
119
120
121
122
123
124
# Main file for Ameba1 series Cortex-M3 parts
#
# !!!!!!
#

set CHIPNAME rtl8195a
set CHIPSERIES ameba1

# Adapt based on what transport is active.
source [find target/swj-dp.tcl]

if { [info exists CHIPNAME] } {
set _CHIPNAME $CHIPNAME
} else {
error "CHIPNAME not set. Please do not include ameba1.cfg directly."
}

if { [info exists CHIPSERIES] } {
# Validate chip series is supported
if { $CHIPSERIES != "ameba1" } {
error "Unsupported chip series specified."
}
set _CHIPSERIES $CHIPSERIES
} else {
error "CHIPSERIES not set. Please do not include ameba1.cfg directly."
}

if { [info exists CPUTAPID] } {
# Allow user override
set _CPUTAPID $CPUTAPID
} else {
# Ameba1 use a Cortex M3 core.
if { $_CHIPSERIES == "ameba1" } {
if { [using_jtag] } {
set _CPUTAPID 0x4ba00477
} {
set _CPUTAPID 0x2ba01477
}
}
}

swj_newdap $_CHIPNAME cpu -irlen 4 -expected-id $_CPUTAPID

set _TARGETNAME $_CHIPNAME.cpu
dap create $_CHIPNAME.dap -chain-position $_TARGETNAME
target create $_TARGETNAME cortex_m -dap $_CHIPNAME.dap

# Run with *real slow* clock by default since the
# boot rom could have been playing with the PLL, so
# we have no idea what clock the target is running at.
adapter speed 10

# delays on reset lines
adapter srst delay 200
if {[using_jtag]} {
jtag_ntrst_delay 200
}

# Ameba1 (Cortex M3 core) support SYSRESETREQ
if {![using_hla]} {
# if srst is not fitted use SYSRESETREQ to
# perform a soft reset
cortex_m reset_config sysresetreq
}

$_TARGETNAME configure -event reset-init {ameba1_init}

# Ameba1 SDRAM enable
proc ameba1_init { } {
# init System
mww 0x40000014 0x00000021
sleep 10
mww 0x40000304 0x1fc00002
sleep 10
mww 0x40000250 0x00000400
sleep 10
mww 0x40000340 0x00000000
sleep 10
mww 0x40000230 0x0000dcc4
sleep 10
mww 0x40000210 0x00011117
sleep 10
mww 0x40000210 0x00011157
sleep 10
mww 0x400002c0 0x00110011
sleep 10
mww 0x40000320 0xffffffff
sleep 10
# init SDRAM
mww 0x40000040 0x00fcc702
sleep 10
mdw 0x40000040
mww 0x40005224 0x00000001
sleep 10
mww 0x40005004 0x00000208
sleep 10
mww 0x40005008 0xffffd000
sleep 13
mww 0x40005020 0x00000022
sleep 13
mww 0x40005010 0x09006201
sleep 13
mww 0x40005014 0x00002611
sleep 13
mww 0x40005018 0x00068413
sleep 13
mww 0x4000501c 0x00000042
sleep 13
mww 0x4000500c 0x700 ;# set Idle
sleep 20
mww 0x40005000 0x1 ;# start init
sleep 100
mdw 0x40005000
mww 0x4000500c 0x600 ;# enter memory mode
sleep 30

mww 0x40005008 0x00000000 ;# 0xf00
;# mww 0x40005008 0x00000f00
sleep 3
mww 0x40000300 0x0006005e ;# 0x5e
;# mww 0x40000300 0x0000005e
sleep 3
}

隨手寫點固件

算了.. 不發了, 這個坑太大了。
我是一邊寫 Blog 一邊研究的。文章都寫了一半了, 沒曾想完美翻車。

説起來經歷了不少坎坷。

  1. 移植了 Standard SDK 的 HAL 庫, 發現竟然全是從 lib 中 extern 來的符號,
    而對於寄存器結構是一點説明都沒有, 所以猜測應該是 nda 的。

  2. 其次就是因爲沒有 flash 驅動, 要自己從頭寫。所以沒辦法在 OpenOCD 中下載固件,
    因爲上面 nda 的原因, 自己寫這條路幾乎也是堵死的。不過 GitHub 上倒是有一個參考, 但它不是很合我意。

  3. 最後嘗試用 OpenOCD 寫 SRAM 試圖讓固件直接在 RAM 中跑,
    但不幸的是, 它崩了。

  4. rust 有一個 sdk 庫。結果仔細一看它是 c binding, 實際上還是那個垃圾 Standard SDK。

算了算了, 翻車就翻車吧

最終鑒定: 沒救的電子垃圾。
以後有時間了再搞這個, 可以按第 3 步的方法繼續嘗試。

引用

嘗試移植 Micro Python 到 RTL-8710

https://blog.awa.moe/2022/10/22/rtl8710-with-mpy/

Author

TheSnowfield

Posted on

2022-10-22

Updated on

2024-03-17

Licensed under