用 OpenOCD 玩樹莓派 Pico

簡單介紹

樹莓派 Pico 是樹莓派基金會 (Raspberry-Pi Foundation) 在 2021 年發售的一款嵌入式設備,
跟以往的 RPi 1/2/3/4 采用 Linux 系統的開發板來比較而言, 它則是采用了自己研發的 RP2040 嵌入式 MCU。

RP2040 集成了 Dual-Core ARM Cortex-M0+, 默認頻率為 133Mhz。 它特能超頻, 能超到 400Mhz
它還具有 264KB 的片上記憶體, 並支援高達 16MB 的片外 Flash。 IC 保密性全給它揚咯

這是 Pico 的 Pinout
img

對於我這種 ST 我説的不是色圖 重症患者來説, 僅僅需要花上大約 5 CNY 就能買到比 STM32F0C8T6 更强的方案, 這是非常具有誘惑力的。

還沒開始就翻車

看到 Pico 屁股上有一個 SWD 接口, 就直接拿 CMSIS-DAP 連上去, 熟練地打開 OpenOCD

1
2
3
$ openocd -c "adapter speed 100"     \
-f interface/cmsis-dap.cfg \
-f target/rp2040.cfg
然後原地爆炸
1
2
3
4
5
6
7
8
9
10
11
12
13
14
15
16
17
18
19
20
Open On-Chip Debugger 0.11.0 (2021-11-18) [https://github.com/sysprogs/openocd]
Licensed under GNU GPL v2
libusb1 09e75e98b4d9ea7909e8837b7a3f00dda4589dc3
For bug reports, read
http://openocd.org/doc/doxygen/bugs.html
adapter speed: 100 kHz

cortex_m reset_config sysresetreq

Info : Listening on port 6666 for tcl connections
Info : Listening on port 4444 for telnet connections
Info : CMSIS-DAP: SWD supported
Info : CMSIS-DAP: JTAG supported
Info : CMSIS-DAP: Atomic commands supported
Info : CMSIS-DAP: FW Version = 1.10
Info : CMSIS-DAP: Interface Initialised (SWD)
Info : SWCLK/TCK = 1 SWDIO/TMS = 1 TDI = 1 TDO = 1 nTRST = 0 nRESET = 1
Info : CMSIS-DAP: Interface ready
Info : clock speed 100 kHz
Error: Error connecting DP: cannot read IDR

怎麽會事呢?
在翻閲大量倉庫之後, 發現 OpenOCD 有一個 RP2040 分支。
遂去翻找 OpenOCD 的目錄, 發現有一個叫 openocd-rp2040 的可執行檔案。 原來是用錯了啊

換上它, 重新運行一下命令,
出現了 USB 斷開連接的提示音, 想必是 Reset 掉了。

但是它仍然不工作
1
2
3
4
5
6
7
8
9
10
11
12
Info : clock speed 100 kHz
Error: CMSIS-DAP command CMD_SWD_Configure failed.
Info : SWD DPIDR 0x0bc12477
Info : SWD DLPIDR 0x00000001
Error: CMSIS-DAP command CMD_SWD_Configure failed.
Info : Read incorrect DLIPDR f0000001 (possibly CTRL/STAT value) when selecting coreid 1
Info : DAP init failed

Error: CMSIS-DAP command CMD_SWD_Configure failed.
Info : Read incorrect DLIPDR f0000001 (possibly CTRL/STAT value) when selecting coreid 0
Error: CMSIS-DAP command CMD_SWD_Configure failed.
Info : Read incorrect DLIPDR f0000001 (possibly CTRL/STAT value) when selecting coreid 1

按理説 CMSIS-DAP 作爲 ARM 開發中最推薦使用的編程器,
理論上通吃所有 ARM 的設備, 其中自帶的 JTAG 也足以支援絕大多數的處理器, 不應該有問題才是。
翻車警告

尋找解決方案

其實它的解決方案還挺多的, 其中不乏一些邪術

I. 使用 Picoprobe

使用兩個 Pico, 其中一個 Pico 充當 SWD 調試器, 另一個 Pico 作爲開發設備, 它對應的是 OpenOCD 中的 interface/picoprobe.cfg, 需要事先燒錄固件。

img

這也是網路中流傳的最多的方法, 它簡單並且對新手友好。
但是我覺得很便秘, 我有編程器爲什麽要去做一個新的

II. 使用樹莓派作爲 SWD 調試器

這個就更加便秘了, 不再贅述。我相信你也不想用它。

III. 使用 Pico 的 cpu0 去調試 cpu1

在上邊的文章中, 我們已經知道 Pico 有兩個核心。
這個方法比較少見, 至少我在硬體開發經驗中從來沒見到過這種方法。

不過實際用起來也很方便, 只需要把預先編譯好的固件拷貝到 Pico, 在短暫的下載之後, Pico 會變成一個虛擬的 CMSIS-DAP,
然後我們就可以像以前那樣對它進行開發了。

img

後邊使用 MDK 對 Pico 編程的時候會使用到這個方法。
倉庫地址 majbthrd/pico-debug

峰回路轉

話説回來, 我在搜尋資料的時候, 偶然發現有人這麽説

Most debugging tools don’t yet support multi-drop (particularly for CMSIS-DAP),
including Raspberry’s own OpenOCD fork,
it automatically does the SWD multi-drop target selection upon a > CMSIS-DAP DAP_Connect.

看起來由於 RP2040 的特殊架構, 使得一些並不支援 Multi-Drop 功能的調試器無法使用。
差不多是這個原因了吧。

那既然 CMSIS-DAP 不能用, 那我首先想到了 JLink。
搞事之前首先排除 STLink, 這玩意除了用在 ST 上其他的都是坑。 STlink 有些時候也會坑 ST
相比之下在 STLink 遇到的玄學問題, 用 JLink 大概率能解決。

img

在換上 JLink 之後,
意料之中, 使用以下命令果然就能連上了。

1
2
3
4
$ openocd_rp2040 -f interface/jlink.cfg                       \
-c "transport select swd; adapter speed 100" \
-f target/rp2040.cfg \
-s tcl
它如魅力一般工作, 並且成功檢測到了兩個 Core
1
2
3
4
5
6
7
8
9
10
11
12
13
14
15
16
17
18
19
20
21
22
23
Open On-Chip Debugger 0.10.0 (2021-11-16)
Licensed under GNU GPL v2
For bug reports, read
http://openocd.org/doc/doxygen/bugs.html
adapter speed: 100 kHz

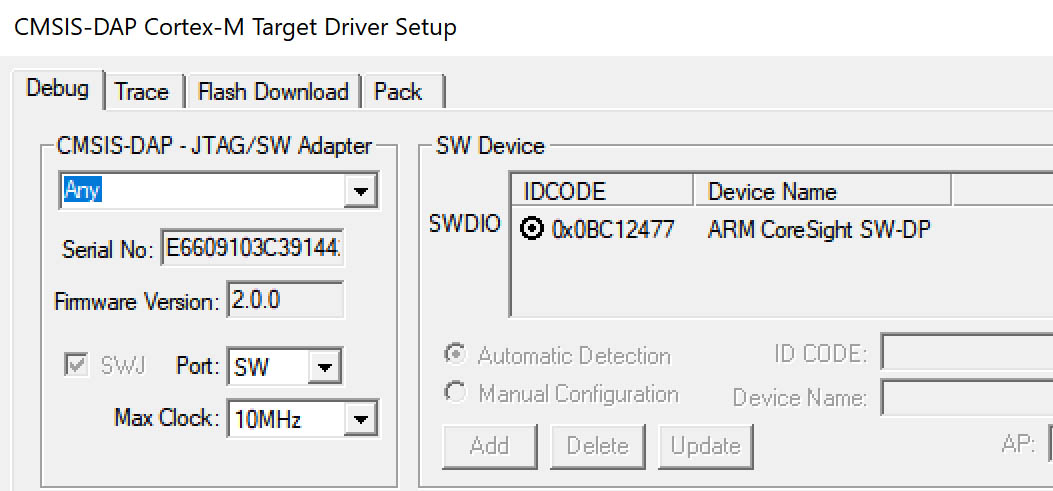
Info : Hardware thread awareness created
Info : RP2040 Flash Bank Command
Info : Listening on port 6666 for tcl connections
Info : Listening on port 4444 for telnet connections
Info : J-Link ARM-OB STM32 compiled Aug 22 2012 19:52:04
Info : Hardware version: 7.00
Info : VTarget = 3.300 V
Info : clock speed 100 kHz
Info : SWD DPIDR 0x0bc12477
Info : SWD DLPIDR 0x00000001
Info : SWD DPIDR 0x0bc12477
Info : SWD DLPIDR 0x10000001
Info : rp2040.core0: hardware has 4 breakpoints, 2 watchpoints
Info : rp2040.core1: hardware has 4 breakpoints, 2 watchpoints
Info : starting gdb server for rp2040.core0 on 3333
Info : Listening on port 3333 for gdb connections

之後我們就能對它做一些擦除操作了。

1
2
3
4
5
6
7
8
9
10
11
12
# 連接上 OpenOCD 實例
$ telnet localhost:4444

# 探測 Bank 0
> flash probe 0

# 整片擦除
> halt
> flash erase_sector 0 0 last

# 檢查是否擦除成功
> flash erase_check 0

未完待續

Author

TheSnowfield

Posted on

2022-05-22

Updated on

2024-03-17

Licensed under